Monday 10 September 2018

Speshink DT - Louise - The Gent steampunk style.


Afternoon all, 
I hope everyone is keeping well? Today the Dt is back with Louise who has created this beautiful Steampunk style card using my 'The Gent' stamp. I love all the patina effect Louise has created on the cogs. Here is what Louise hase done xx.

Hi All its time for Cogs " Colours must fit together as pieces in a puzzle or cogs in a wheel" Han Hofmann Quote i rather like. 
So here is what i did to make this card 
Taking a square of card i painted it in a shade of ochre and then embossed it a few times with a Xcut Cut and emboss folder called Steampunk Cogs xcu 503812
To highlight the cogs i used Ocean Teal Gilding Polish and buffed it up and then added some black distress crayon to tone it down in places 
The Gent was coloured in wax pencils and cut out adding an extra flower for depth 
Bronze paint was flicked over the background for more interest 
The embossed card was mounted onto silver and black card hey presto completed thanks for looking.


Monday 13 August 2018

Speshink Design Team - Saadia - The Gent


Morning all, I hope you all had a good weekend, Today Saadia is sharing an art journal page she has made using my The Gent stamp  avilable from my web store.
Here is what Saadia has done. 

Sharing with you an art journal page. 
I used 300 gsm watercolor paper and glued book pages to it with gel medium.
Next, I applied a thin coat of Heavy white gesso by Prima marketing Inc. Added a bit of texture with sand paste by Prima marketing. 


After drying the texture paste, I applied washes of Paynes Grey color by Winsor and Newton, Quinacridone/Nikel Azo Gold fluid acrylic by Golden. 
Next I applied home made rust pastes to brick chip board shape by Blue Fern studios. I added the same pastes to some metal gears.


After that, I stamped 'The Gent' stamp on watercolor paper and colored it with Kuretaki watercolors.
Then, I glued everything with 3d Gel medium.


Lastly, I glued a chipboard quote over a piece of twine.


That's it for today. 
I hope you liked it. 
Thank you. 


Monday 6 August 2018

Speshink DT - Jane- The Aviator


Morning all, and thanks for stopping by, I am sorry there was no post last Monday, sometimes life just gets in the way.x But we are back this Monday and today Jane is sharing a beautiful card she has made paying tribute to Mary Ellis.


Products used...
The Aviator Stamp by Mark Gould/Speshink
Memento Ink - Desert Sand
Copics - E21,33,35,37,50,51,53  W1,3,5,6,7,8  Y21,23,26  R11,21 C4,5,6,7,9  B91,93,9597
Copic Multiliners - Black and Sepia
White, blue and red Cardstock 

Hi everyone,

Here is my project for this week!  It’s not what I had planned to show you but after the lovely lady Mary Ellis passed away last week, I felt this Stamp was perfect for her.
I grew up close to RAF Kenley, an active station during WW2 although only gliders fly from there now.  I spent many hours playing in and out of the old air raid shelters (wouldn’t be allowed today) and was very aware of their important use during the war.  My dad loved the the old aircraft and one day  I intend to have a flight in a Spitfire for him as he would have loved it. 

This year is the Centenary of the RAF and last week we lost a lady who was one of a number of women pilots responsible for flying the aircraft around the country to different airfields.  She reached the great age of 101 years and had many stories to tell!  An amazing lady who flew all sorts of aircraft during and after the war finished.

So my project this time is a tribute to her and the RAF.  Hope you like it!


I started by stamping the image with Memento Ink and colouring with Copics....


What we do without google!  Lots of RAF images gave me what I needed to make a background collage....


Start building up your collage.  My mounts were blue, red and white although the blue hadn’t come out very well in the photo!


Finish by adding your image and text...


Jane x


Monday 23 July 2018

Speshink Design Team - Louise - The Aviator


Morning all, Today we have a clever card made by Louise Using the Speshink Aviator Stamp.
                                                            Stamps available HERE.
Masking stamps and over stamping can leave great results and add extra depth to a project.
Here is what Louise has to say xx.

Well i thought i needed to start using a lot more colour so here are my rainbow helmets 
1. Taking a A4 sheet of white card i folded it in half and using the Aviator stamp and black versafine stamped her down on the right hand side of the card leaving off the collar
2. taking a mask made from a post-it note of the aviator I covered up the first image. Then dropping the stamp down again, Stamped  to the right of the image, overlapping the first image.
3. I continued overlapping and dropping the stamp using the mask to achieve 4 images of the aviator along the card.
4. I used prismacolour pencils and blended with a blending pen keeping to rainbow shades
5.The phrase "NEVER WAS SO MUCH OWED BY SO FEW" was stamped onto paper with dovecraft apha stamps DCVWOOSO  cut out and modge podged down.  


Monday 16 July 2018

Speshink Dt Gloria. Gypsy Rose.

Morning all, and thank you for stopping by for another Speshink Design Team post. Today Gloria is sharing a make using my Gypsy Rose stamp.

I'm back again with a new Spesh Ink project
using the Gypsy Rose image available here
I like the term fortune teller better, 
but that's just me being difficult.

In an attempt to use a different technique for each of these projects, I decided to
give the no-lines technique a go with this lovely lady.
I started by stamping her with Antique Linen Distress Ink using my Misti.

I began coloring her flesh first just in case it was harder to do the no lines
technique than I thought. Not too bad. It's been quite a while since I've colored
with Copics this way. 

The hair is the bane of my existence, but I think it worked
out in the end.

I decided to leave her pearls out of the equation entirely.
I just felt she didn't really need them at this point. 
Much like the print on her head scarf. Gone. 

I colored the background in with Copics, and then dropped blending fluid
onto it to give a bit of a bokeh effect.

Using an art journal insert page, I sprayed it using Dylusions sprays
and stamped some gold embossed stars. 

I matted her onto black card stock and added some words watercolored
to match the image.

Lastly, I added some sequins to really make her happy.
What's a gypsy without sequins?


Monday 9 July 2018

Speshink DT - Saadia - Gypsy Rose


Afternoon all, and thank you for stopping by. Today as part of the Speshink Dt, Saadia has created this beautifully layered journal page using my Speshink Gypsy Rose stamp.
Below is a little description of what Saadia has done. xx

Brief process:
Its a very simple journal page. I hope you like it. 
Lets start:
 I used a 300 gsm /140 Ib watercolor paper and made the background with Dylusions ink sprays in Laid back lilac and Funky fuschia colors and Dina Wakley paints. I used different stencils for the background. 
Next, I doodled a little bit with White Gelly roll pen. 
After that, I stamped 'The Gypsy Rose' image on watercolor paper using Tonic studios stamping platform and colored the image with Kuretaki Gansai Tambi watercolors. 
Lastly I added the sentiment stickers.
Thank you for visiting.


Stop by next Monday to see what Louise has created using my Speshink Stamps.


Tuesday 3 July 2018

Speshink DT - Jane - Gypsy Rose


Evening all, and apologies for the delay. Life happens ;)
this evening Jane is here sharing a beautiful card topper using my Gypsy Rose stamp. Available from my Shop at the top of the page.

Products used -

Speshink/Mark Gould Stamp - Mark Gould - Gypsy Rose
Doo Lally Pip Stamps - Lindsay Mason - I’ve had enough
Copics -
R000, 00, 01, E41, 44, 47, 49, YG03, 05, 06, R22, 24, 27, 29, C3, 4, 5, Y19
Memento Ink - Black 
White Mulberry Paper
Coloured Cardstock
Hessian
Gems
Glitter

Hi everyone, it’s my turn here again on Speshink blog.  And it is totally my fault why you have been kept waiting, I’m so sorry.  Let’s hope the wait is worth it!

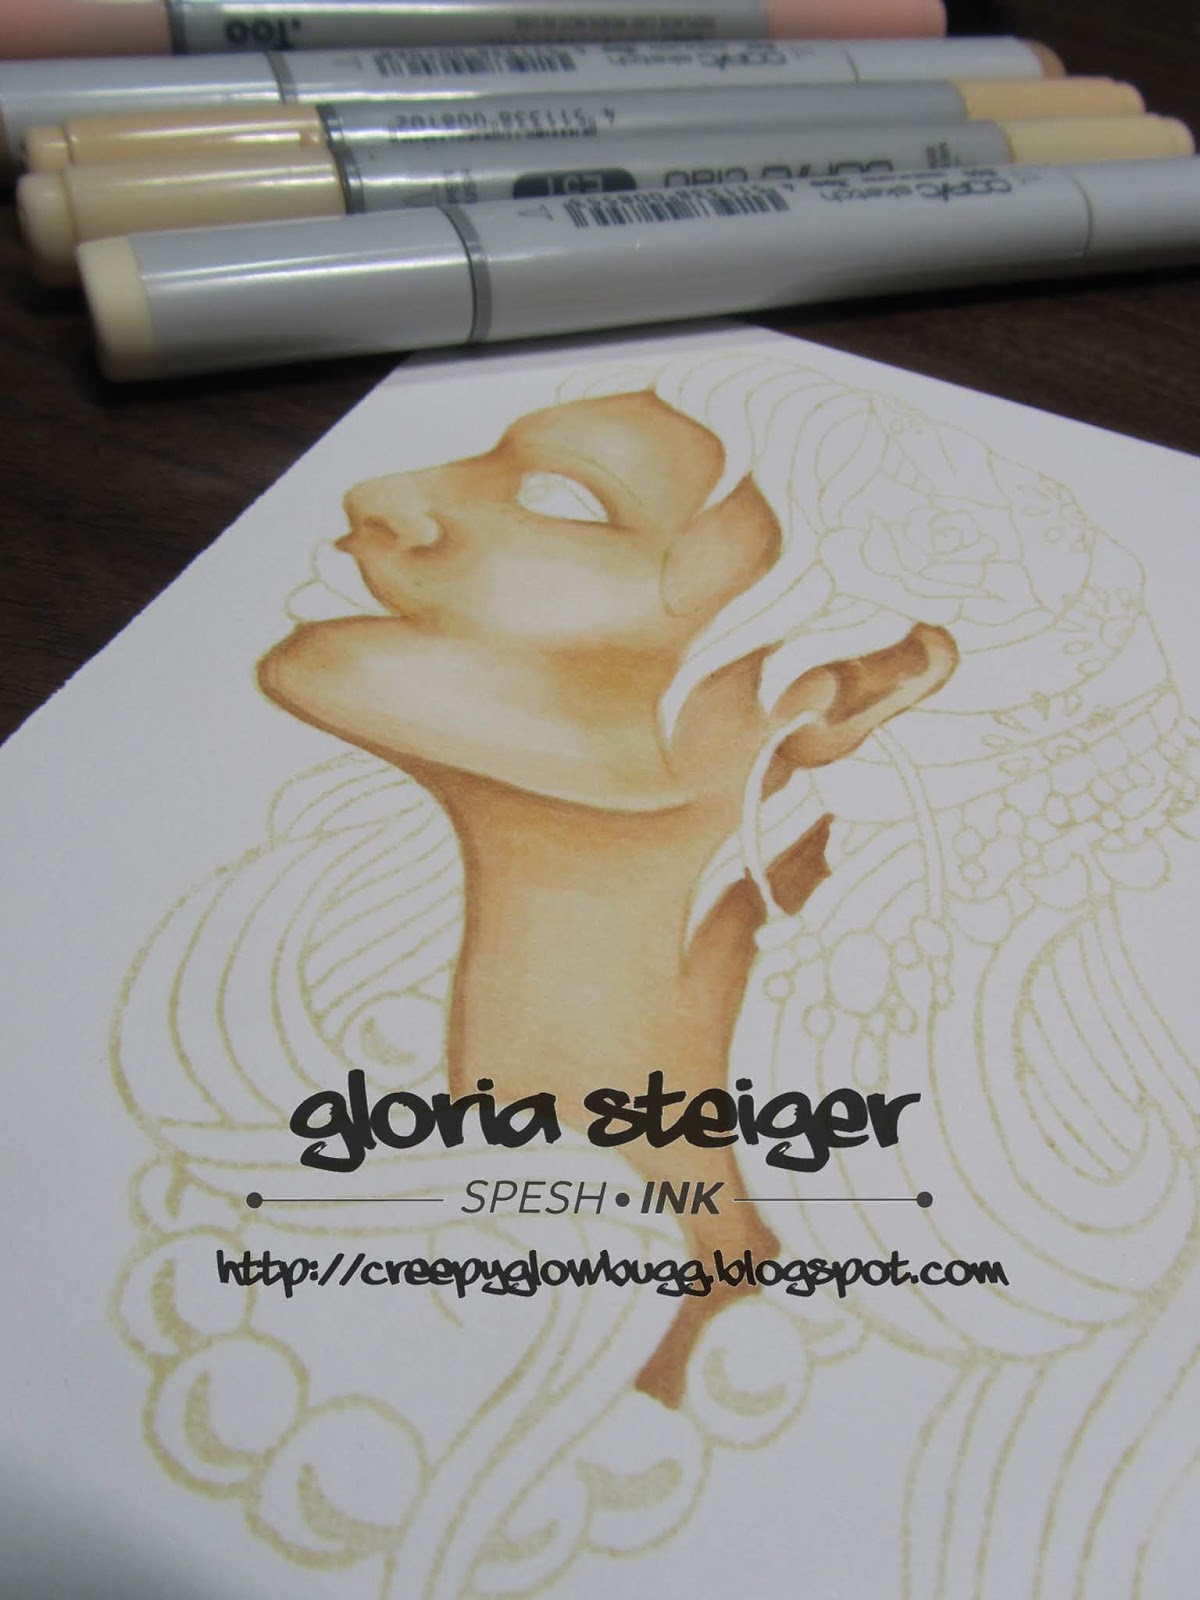
This time I’ve stamped the lovely Gypsy Rose onto white mulberry paper.
Because I’m going to use Copics, I’ve used Memento Ink but be prepared for it not to be a crisp image, it will bleed slightly.  But that’s ok, I wanted it to do that!


Leave the ink to dry for a little while, it wasn’t a problem here as it is so hot, 5 minutes and you’re ready to go.

Choose your pens and start to colour, you’ll not be able to blend on mulberry paper as you normally would.  The ink will soak through easily, so make sure you have plenty of scrap paper under your image and keep moving it, you don’t want the darker Inks to come back up through the lighter colours.  Have a blender pen  handy for pushing colours that bleed back into where they should be!  I liked the bleeding around the outside edges but not too much within the image.


When you are happy with your colouring, take a wet paintbrush and water and dampen the mulberry paper where you want to tease around your image.  This gives a lovely wispy edge.


When it’s dry, I used a decoupage glue to stick it on to a piece of hessian.  I like how you can see the texture of the hessian through your coloured image.


Then layer two pieces of card together, I used a scuffer on the edge of the larger red piece.  Add to your base card and then stick on your hessian and image.


Stamp your wording and use the chisel end of your pens to give a small border.
Add a few gems, again coloured with your Copics and finish off with......glitter.  Mark’s favourite ha ha !


Hope you like it

Jane x


Monday 25 June 2018


Morning all, and as always a big thanks for stopping by. Today Neil Walker  is sharing a colorful apron he has made using my Sailor Jim stamp, available from my shop at the top of the page or through Chocolate Baroque Here.

Good morning friends.
My turn on the Mark Gould DT this week sees me heading sea side.....
I decided to add some interest to a plain white craft apron that I have had knocking about for a while now, just waiting for inspiration. Which arrived in the form of Mark's Sailor Jim

This was a fun project to do and I took things very casually.
To start I used Infusions to add some colours blends and dried it off.


The focal image was stamped onto the fabric and onto white card (cut out to create a mask)


With the paper mask in place the background was filled in with a random assortment of my stamps from The Artistic Stamper..


Painting on fabric has it's own challenges so I just decided I was not going to get too hung up on staying in the lines.  I used DecoArt Media Fluid Acrylics to paint with. Sailor Jim is the focal point of course so I spent  more time  painting him


Then just some simple highlighting and fun to tie the background together.

I added the sentiment using a Sharpie


I hope you like it. I had a good time making it. Sailor Jim is available HERE


Thank you for stopping by, Head back next Monday to see a new creation from the Speshink DT. xxx


Monday 18 June 2018

Speshink DT Louise - The Gent and The Aviator Monochrome.

Morning all and thanks you for stopping by. 
Today Louise is back with us and sharing a couple of fantastic makes using my 'The Gent' stamp and 'The Aviator'.
My stamps can be found on my Etsy Store Here or on the 

Louise's first project is a monochrome black and white card that was ideal for fathers day. xx


Keeping this card black and white gave this a simple finish i really like.

  1. Taking a 15x21cm bit of card I rounded off the edges with a corner punch.
  2. Masking off the Gent stamp with masking tape i covered the wreath frame and then inked with versafine onyx black. Removing the tape i stamped out the Gent on the card.
  3. Then covering the stamped image with a mask made from a post it note, stamp out the gears in the background. I used a Chocolate Baroque Stamp June Gears in versafine Smokey Gray
  4. At the base of the gent i stamped over the mask using a Top Hat watches stamp from Creative Expressions CER014 in onyx black.
  5. The watches were stamps from the Top Hat set. I stamped them onto some card and cut each watch 11 in total the largest is a stampede nostalgic pocket watch stamp A2528D. I then layered and glued them around the Gent.
  6. The Phrase "Time is not measured by clocks but by moments " i printed out and added as the finishing touch. 


Keeping with the black and white Monochrome Louise has also created this beautiful card using my Aviator stamp.


  1. I firstly took a square piece of card, and stamped the image of the Aviator in black versafine to the right of the square. Then using a black watercolour paint, watered down, painted shading into the image
  2. Once the paint was dry, i masked the image with a post it note.  Along the bottom and right hand edge I stamped in black a frame. The stamp used for this is a Kate Pertiest Autumn Leaves on the edge AL3040
  3. To finish the image,i stamped "be unique" to the left, using a Crafter Companion Stamp "Words to Inspire" set 1 TXT.ST.INSP1
  4. Mounting the square onto black card it was glued to a 7x7 card  and hey Pesto ..


Again thank you everyone for stopping by. Head back next Monday to see something new from the Speshink Design Team. xxx


Monday 11 June 2018

Design Team - Gloria Sailor Jim Journal Page.

Morning all, I hope you all had a lovely weekend?
we are back to the start with our Design Team Members as today,
It's Gloria's turn to! 

I'm back today with an art journal page I made using
the Sailor image from Spesh Ink.


I began with a loose sheet insert for my journal made of kraft card stock.
I inked up my new Skinner stamps and used them as my background.
To finish off the background, I added some distress oxides in black soot and
walnut stain. Splashed some water on it, and let it dry.  


I colored the sailor using Copic markers, and then I fussy cut him out.
I decided to cut off his hat to see how he looked, and inspiration struck!
  

I started going through my stash of cogs and schtuff to see what I could
arrange spilling out of his head. I decided to keep it relatively simple with 
only a few odds and ends. I used a couple colors and layers of embossing powder
to cover the previously hot pink arrow. I think it looks like turquoise now. 


I added the word, 'journey' and used NuVo drops in black to color it,
and turquoise drops to dot the 'j'.


I used a chipboard piece for more interest, and some distress crayons
for some depth and contrast to finish it all off. 


I am thrilled with how this guy turned out!
This would be a great image to use for any masculine themed card.


Monday 4 June 2018

Speshink Dt Saadia


Process steps: 

I applied white gesso to the pages of my Jane Davenport journal
followed by, modelling paste through a TCW stencil.
Then, I colored the pages with Marabu Art Sprays.

After that, I applied Dina Wakley media paints through 
The Crafters workshop stencil.  
Next, I decoupaged floral napkins in some areas.

Then, I glued die cut elements from the Tim Holtz Sizzix Mixed Media die set.
I stamped the Gypsy Rose stamp with Jet Black Archival ink on watercolor paper  
and colored the image with Kuretaki Gansai Tambi watercolors. 
Finally I glued some butterflies and sentiments from Tim Holtz stickers. 

 I hope you like it.

Monday 28 May 2018

Speshink DT Jane Collman. Gypsy Rose Copic Card.

Is it Monday yet?
Thanks for stopping by, I'm delighted to introduce Jane Collman to the Speshink DT and today we are sharing something I never thought I would see on my blog....
Some glitter ;)
I have known Jane from the start of my crafting journey where I took one of Jane's Copic classes at my local store and it really helped my get to grips with the pens.


White Stamping Card, Silver Mirri Card, Black Card, Pearlescent Silver Base Card
Memento Ink - Tuxedo Black
Copic Markers - C 1, 2, 3, 4, 6, 8 and Blender
Ranger Stickles - Silver
Gems
Flower and Leaf Dies 

Instructions -

Begin by stamping image with Memento Ink onto white stamping card.  Choose your colour Copics, I used the Cool Greys C1, 2, 3, 4, 6, 8.  Have your blender handy too!


After trimming the image, I picked two colours and using the chisel end of my marker, coloured around the edges.
I then layered the image onto silver Mirri card, black card and finally a pearlescent silver base card.


Die cut some leaves and flowers and colour with your Copics....


Add some silver Stickles glitter glue to her scarf...


Decorate with your flowers and leaves, I used a silicone glue.
Colour some clear gems with your darkest Copic and add to centre of flowers and edges of card.