Showing posts with label Tim Holtz. Show all posts

Monday, 7 May 2018

Speshink DT Glo. The Gent.


Welcome, Welcome, Welcome, and thank you for stopping by on this very exciting post as it is the first post from my new DT and I hope you guys love it as much as I do.
Today's make is from Glo.
I will have new makes every Monday from one of my amazing Dt members so keep heading back to see what they have created for you xxx.


Man, where does the time go? Seems only yesterday I was trying
to get back into creating and blogging more often. Then, radio silence.
Well, I'm back! 
This time I should be around a bit more often since I am on the newly
supporting and creating art using the current line of stamps created by 

I chose to start by creating an insert page for my art journal.
I picked up a pack of these from Tuesday Morning on the cheap. 
They came in three different colors; manila tag, black, and kraft. 
I had the bright idea to use a black page, and then I heat embossed The Gent 
image with black powder. Now, how the heck was I gonna color this thing?!

I decided to give it a go using some Stampin' Up watercolor pencils.
Since my selection was limited, I was challenged to come up with a flesh tone.

I ended up using browns, oranges, yellows, and white. 
Not sure it worked all that well, but it does convey a flesh-ish tone.   
It toned down quite a bit once I used some water to blend it out.

I created the background using Distress Oxide inks.
I love these inks. They blend like buttah, and I love the
oxide effect that is achieved simply with water.  

 I have a bunch of mustache brads that I rarely use, so I was
determined to get one on this project. I used it to cross the "t". 
Pretty cute, if I do say so myself.

I added some washi tape and hardware to the upper corner.
I tried to keep it pretty flat along the left hand side as it will be added 
to my art journal, which already has issues closing.

 I added some silver gear die cuts, and broke out my Distress crayons
to add distress and grunge all over the place. I love the black crayon. It's perfect
for adding dimension and shading on projects like this.
Lastly, I added black and white splatter to give an over all cohesiveness to the page.

That's it for me today.

Wednesday, 25 April 2018

Why I Love My Tim Holtz Stamp Platform Step By Step


So how is everyone doing? 
I know the blog has been quiet recently but that is all due to change as starting next month, I am extremely happy to announce the new Speshink Design Team will be going live with posts coming each Monday to the blog featuring makes using my New stamps available at Chocolate Baroque or through the Shop Tab at the top of my blog.
There will be a post in the next couple of days introducing the new team.
( I am sorry if I have not got round to contacting everyone that applied, I was completely caught off guard and overwhelmed with the response for the team xx )

Ok, so today's post is all about why I love the Tim Holtz Stamp platform from Tonic Studios.( Not just because it works great with my stamps ;) )
I mainly work with acrylic paints and it can be hard at times to use an image that needs to be colored over a painted surface as the paint can/will obscure the stamped details this also holds true for surfaces like design papers, and until the stamp platform arrived it was almost impossible to line up and re stamp an image you have already stamped.
( I hope I am making sense? )
The stamp platform allows you to stamp an image and then have a perfect alignment for re stamping in the same place. This lets you stamp an image, paint in the details without worrying to much about going over the lines and then re stamping the image over the painted version.
Below I have stepped out how I use the Stamp Platform.
The best thing is it even works with substrates like mdf and grey board, you just have to be careful about where you position the substrate, the thicker it is the further away from the hinge you need to work.


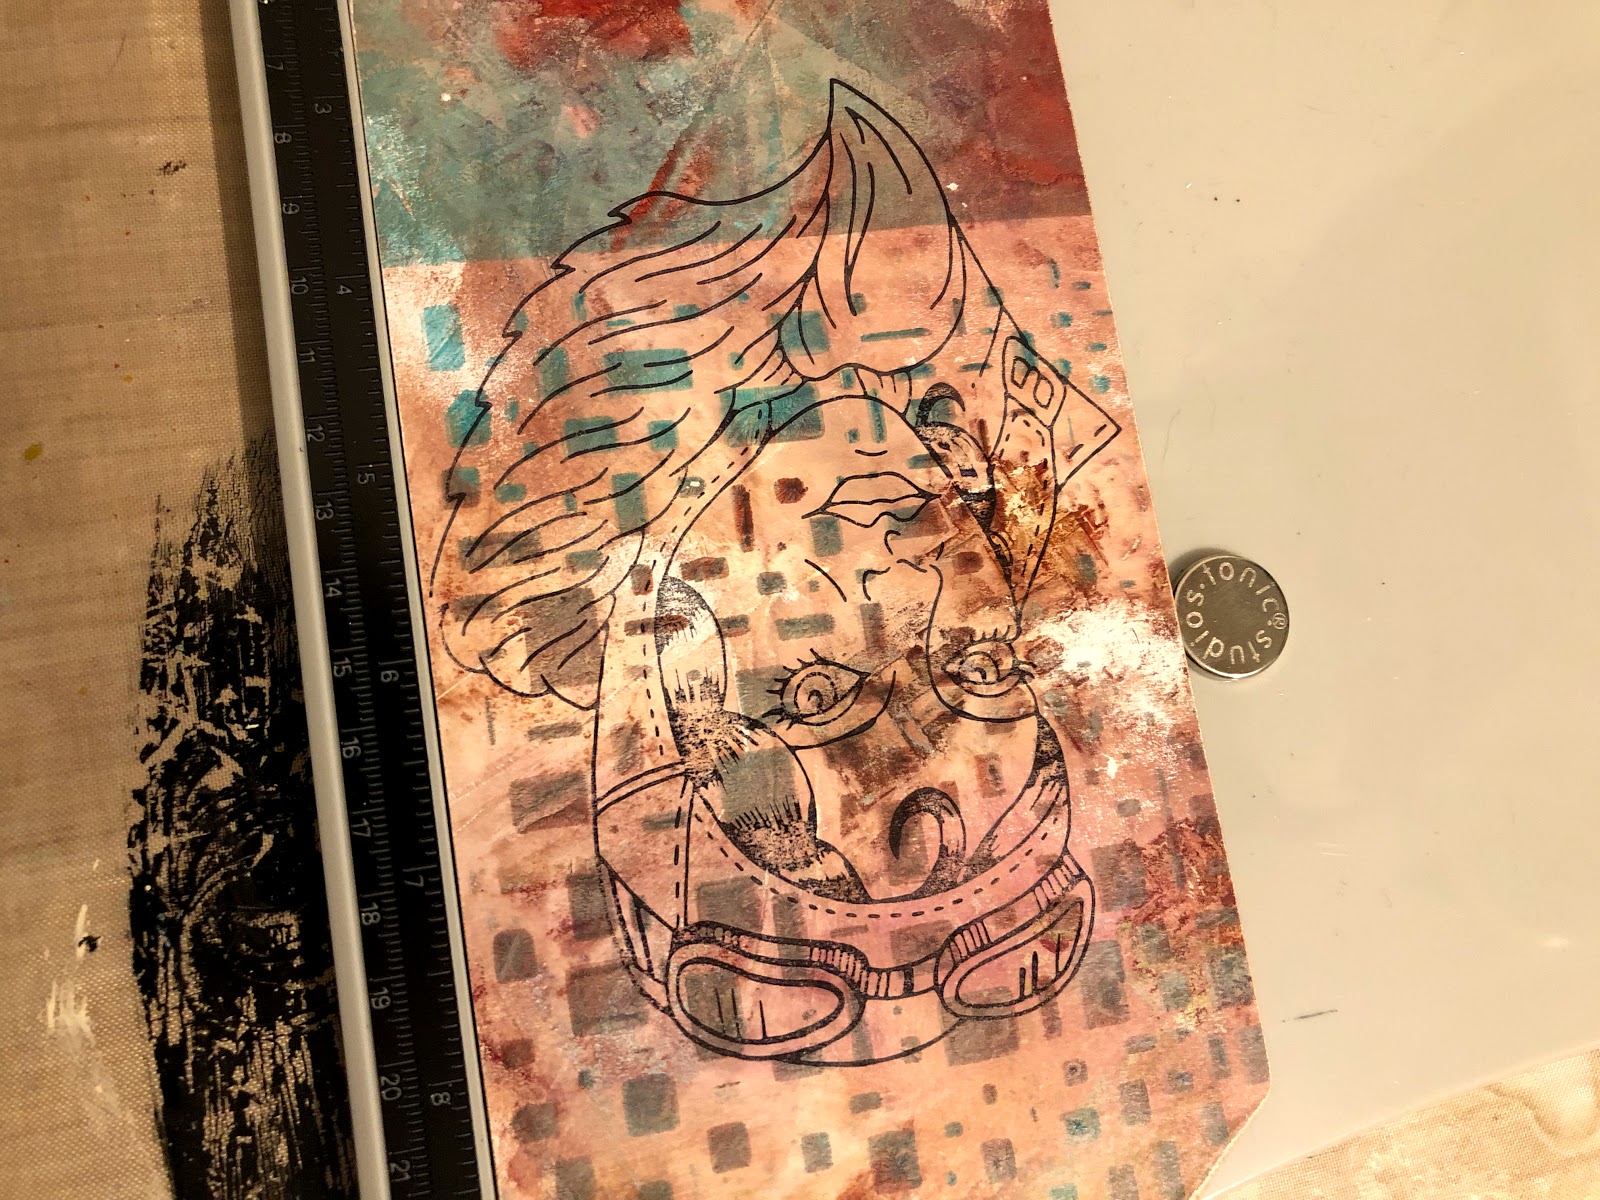
Start with your substrate, I have used an Mdf tag that has been covered with a Gel Plate print I made a few weeks ago.


The magnets wont be able to hold the tag down as it is to thick but you can use them as a guide for the bottom and side edges of the tag, Just be careful when you remove the tag as you do not want the magnets to move.
position the un inked stamp face down where you want the image to be stamped.


Close the lid and apply enough pressure to pick the stamp up.  One side of the platform is for foam mounted stamps and the other side is for clear cling stamps.


Ink up the stamp and close the Stamp Platform and apply even and firm pressure to get a nice cleanly stamped image, I have used archival ink


As you can see the image is visible but gets lost with the background details and colors. Don't worry, you only need the lines there to help guide you when you start to add paint to the image.


Now the fun begins ;)
Pic a medium to fine detail brush and start to fill in the design. I have used My Aviator stamp fr this tag.
You don't need to worry to much about painting ontop of the inked lines, just be careful not to go outside the lines. This process is actually easier and quicker than it may look and is quite forgiving once you get to re stamping over the top.
You can see a lot of the inked detail has been lost but its a lot easier to paint straight over the lines rather than going around them.


once the paint is dry, carefully place the tag back on to the Stamp Platform and re ink the stamp.
fold the lid back down and stamp over the painted surface.


Carefully lift the lid up and you will be left with a perfectly lined up and over stamped image.


Now I should have stopped there as I really liked the way the tag was looking but I had to keep on fiddling and I decided to stamp the word Fly to the top, this looked horrible and I had to figure out a way to save the tag.


I ended up using some of the Tim Holtz Printers Blocks to hide my botch. The details have been bought out using Decoart Media fluids to give a distressed look to them, I have also added some of Tim's mini stars that have been aged using Decoart Media Antiquing Cream.


Thanks for stopping by and don't forget to head back in a few days where I can introduce you to the New Speshink DT. I am so excited to share their work with you all. xxx


Thursday, 8 March 2018

Mothers Day Tags


With mothers day in the UK arriving this Sunday I needed to get my craft on and create something for my mum, I am also on double duty as my Sister had a little sprog just over a year ago and till said sprog is able to head to the shops and select a card i have decided to cover all the important occasions for her.
I used an MDF tag from That Craft Place and picked out a design paper for my back ground.
The Tim Holtz stamp platform really comes into its own for me with this technique, and is the reason I picked one up. I was initially skeptical on how the platform would work with a thick substrate, (the mdf is 4mm thick) and i was worried about how accurate the over stamping would be, I needn't have worried, By placing the tag towards the outside edge of the platform I had no trouble getting my image to stamp and it lined up perfectly when I cam back to over stamp.
( I will do a proper little step by step soon )
The Image was stamped using black archival ink and the image was painted using Decoart Media Fluids, you can be quite bold with the paint and it doesn't matter if you paint up to or onto the black ink lines. Once all the painting is done, carefully place the tag back on the stamp platform using the magnets as position guides, re ink the stamp and stamp over the top of the painted image, as the platform is so accurate the lines match up and there is no double image, it really tidies up the painted image and makes using acrylic paints much easier to work with stamped images.


My second tag has been turned into a tag card and I have gone for a more clean and simple look using a faux chalk board finish and this time the Gypsy Rose image has been stamped using a versamark ink pad, some Stamp n Bond from Stampendous (basically a glue that works like an embossing powder) this stuff is great, no more mess with wet glues like the flitter/flutter stuff that is just to sticky and messy. once the stamp n bond has been heated up and turned clear the silver leaf flakes were added for a little bling ;)


Hopefully my Mum ad Sister will like them.

You can find the Gypsy Rose Stamp as well as my other stamps in the Shop section at the top of the page or on the Chocolate Baroque web page under Mark Gould.

Stay Tuned for the new Mark Gould/Speshink DT that will be hitting this blog very soon.


Simon Says Stamps Monday challenge this week is Whatever The Weather and they are asking us to use any Tim Holtz Product, I have used the Tim Holtz Stamp Platform for my Painted Gypsy Rose.


Wednesday, 8 November 2017

ATC Background Tutorial post


Afternoon all, today I am sharing a simple background tutorial on the Andy Skinner blog, Head on over and you can see how I made the back grounds for these Atc's and I have used lots of Andy's Stampendous stamps and the Decoart Media Fluids with Atc blanks from That Craft Place.

The Atc's below use the background technique but stamps from Tim Holtz and Carabelle Studio.


Tuesday, 21 March 2017

Chalk Paint ATC's


Thanks for stopping by, I hope all is well where you are?
With mothers day and my sisters birthday coming up this weekend I needed something to give my mum and sister and as I am not a big card maker I decided to be a little different and make some Atc's and use them instead.
I started with some mdf blanks from Tando Creative and used Decoart's Chalky Finish Paints for the background.
I used three of the new colours in the range and used the same three colours for each Atc just varied the amount of each colour as I blended them together allowing each colour to partly dry before adding the next colour, this allowed for a softer blending and different colour tones to show through.
I used the colours, Colonial, Victorian and Bestow.


I have used the Tim Holtz Pear stamp and stamped using Stazon ink. the edges have been distressed with the ink and the back has been painted black so I can write a birthday message to my sister with a white posca pen. The Atc has been finished with a satin varnish, this really helps bring out the colours and makes things pop a little more.


This stamp is from Viva Las Vegas Stamps and will be a mothers day card from my 6 month old Niece to her mum with a little message on the back.


This stamp is also from Viva Las Vegas Stamps and this Atc will be making its way to my mum for mothers day.

Thanks for stopping by. xx


Wednesday, 15 February 2017

Decoart Mixed Media Blog Tutorial Post - Painting and working with Acrylic


Today It's  my turn to share a little tutorial post over on the Decoart Media Blog and I have gone for a Vintage Circus style tag using one of the Acrylic Media Boards from Tando Creative and stamps from Carabelle Studio.
If you follow the Decoart Link it will take you straight to the tutorial post xx.
Hope to see you there. x


Simon Says Stamp are having a 'Use your favorite tool' challenge this week. My fave tool has to e the heat gun, I am an impatient crafter and always turn to my heat gun to help things along when I can, I have also used it for one if it's more traditional uses on my tag for some heat embossing.


Wednesday, 31 July 2013

Decoart Glass Stain Key Chain Tutorial.


Hi all, thanks for stopping by, Today I am trying something different, this is my first tutorial, I have been thinking of having a go for a while and a couple of weeks ago I made some key rings using Decoart Glass Stains and thought they might be a good place to start.
I hope you don't mind the waffle and a whole load of pics.
Here is what you will need.


 Decoart Glass Stains
Decoart Triple Thick Glaze
Tim Holtz Fragments
Glossy Card
Distress Ink
Key Chain's (you can use pre made, I have some with the Tim Holtz clips and some made from scratch using parts from the Bead Shop in Brighton )
Any type of charms.
Fine Sand Paper/Sanding Block
Pliers
And of course a selection of stamps.

You can find a list of Decoart Suppliers HERE


 1) The first step is to take your glossy card, I cut my sheet into half but you can go as small as quarters depending on how many you want to make and your colour choices.
I have found it best to use three colours to get a nice blended look.
Squeeze the Glass stains out randomly and quite generously across the piece of card, I have used red yellow and orange here.

 2) Take the other half of your paper and place it face down on top of the first piece, slide the paper around making sure you push the stains into all the corners as much as possible, I rotate the paper a little between my hands as well to get nice swirls of colour mixed. Do not worry too much about any small areas of white card showing through, they can be dealt with latter on.Once you have mixed them together enough you can either peal the top layer off, this leaves a more textured finish to the Stains or you can slide the top sheet off leaving a much smoother look to the blended colours.
Set the sheets aside to dry, they will probably be workable in about an hour and if you are careful you can help them along with your heat gun.
   This one has been made using Green Yellow and Blue Glass Stains


And this has Blue, Brown and Black Glass Stains.

 3) Now you get to break out your stamps,I have used black Archival ink for all my stamping and found this to give the best results. You will find some stamps  work a lot better than others, I found the stamps with finer lines gave the best results rather than larger areas of rubber. If you look at the Gent, his body is quite patchy, When you stamp on top of the Stains it is almost like stamping on to glass or acetate, be careful the stamp does not slide and the larger areas of rubber sort of suck when you peal the stamp away lifting off some of the ink. (I hope that makes sense)
 If you are not keen on the white patches of card showing through the gaps now is the time to grab some Distress Ink, The piece of card in the top left of the picture has had some Mustard Seed applied. The Glass Stains act as a resist to water based inks so can be wiped back with a wet wipe or damp piece of kitchen towel.
It is also amazing that you will pick out stamps you may not have used in a while or maybe have never used as you will only see part of the stamp.

 4)  Roughly cut the pieces of card to size, I have laid the Fragments on top of the card to give an idea of what they will look like when finished, It also helps you decide what part of the stamped image you want to use. I'll list the stamps I have used at the end, recognise many?

 5) When you have the card cut down to a manageable size grab your Triple thick. you will not need a lot for each key ring.
Apply a small dollop to your image, grab the fragment that you want to use and push the fragment down firmly making sure all the triple thick is squeezed to the edge and all the air bubbles have gone, do not worry too much about the excess that has squeezed out, you can use a cocktail stick just to pull it away from the fragment but this is also easily tidied up a little later. It is a good idea to use a cocktail stick just to clear some of the Triple thick from the fragments eye hole, this will make it easier a little later when you attach the key chain.
 Leave all your fragments to dry, it is best to leave them over night although  3-4 hours will probably be enough if like me you are impatient ;)

 6) When dry use a craft knife to cut around the Fragment as close as you can, do not worry  if there are little bits sticking out as they will go in the next step.
Grab some fine sand paper or your sanding block and get rid of those rough edges, this also helps get rid of any Triple thick that is sticking to the sides.(It is worth remembering to sand towards the fragment, if you sand away from it you run the risk of tearing the card stock.)

 7) You should now have all your Fragments ready to be added to your key chains, for some I used the Tim Holtz Key chains, I just opened the bottom loop and attached the Fragments closing the loop after, I then added some charms to the top loop, I used some of Tims Word Sticks and other tokens but you can use what ever you like.
The other Key Chains were made from scratch, the chain was cut to length, rings added to the top and bottom with the Fragment and the Key Ring clasp added as well, the charms were added in the same way.
Here are all the key chains I made from my card stock. I still have several sheets left from this make, I used one sheet of each colour.
The other sheets are ready for either more key chains, Journal Pages like THIS or for ATC's like the second one in THIS post.
I have had great fun playing with the glass stains on card, not just glass. Here are the key chains finished.with details of the stamp used.
If you have any questions leave a comment xx
Thanks for stopping by x I hope you managed to stick with it. ;)

These are both from Paper Artsy


 De Stempelwinkel Dali
 De Stempelwinkel Diamonds and Decorations

De Stempelwinkel Dali


Tim Holtz Papillon


This one Is a design from Rick St Dennis and is part of his first rubber set for Smeared Inks Rubber Club


Again Thank you for stopping by, I hope this was not to painful, I think I shall be trying more of these in the future so I am sure I will be able to fine tune the waffle ;) You can find this tutorial and many more by some amazing crafters on the Pinterest page Mixed Media and Altered Art Tutorials, Hosted by Andy Skinner.

I would like to enter these into the challenge over at Simon Says Stamp And Show, their challenge is Ode to Sunshine. I think the colours of the glass stains are so vibrant and summery x these would also make great end of term gifts for your kids teachers ;)