Sunday 29 December 2013

Some Post Xmas Crafting


So how is everyone doing? Over the Xmas eating binges? The roast Dinner was down to me this year and I love a roast with all the trimmings, even if my belt is now on a slightly larger set of notches.
In between bouts of stuffing my face I have been working on several things, some of which I will be sharing very soon, till then I have these, If you are a facebook friend, (feel free to join me) I posted up a couple of samples for consideration and these are the end result.
They are Save the Date Cards for one of Kelly's best friends that is getting married next year, somehow I have been roped into making the invites, save the dates and place cards etc.
I have taken the smaller of the Tando-Creative Mixed Media Boards and have painted the backs using Decoart's Weathered Wood using the accent colour to tie in with the friends wedding accent.
The details were printed off onto some 300gsm card and glued to the boards, edges were sanded and then distressed with archival ink. The Dylusion Stamps have been stamped with Memento ink and coloured with Copics, again matching the accent colour.
They have been finished with the addition of an eyelet and some colour coordinated ribbon.
Now I need to figure out Invites. 
This may be worse than card making ;) xxx

I hope you all had an amazing Xmas and if you are still off for the Holl's I hope you are making the most of it.
Have an amazing 2014.  I'll be back soon xx
thanks for stopping by.


Monday 23 December 2013

De Stempelwinkel - I Actually Made A Card


Is everyone set for Xmas? Not long now.
Today I have a sneak peek of my make over at De Stempelwinkel it's a rare thing for me, a card.
I make very few cards but there are times of the year and people in my life that I can not get away from making a card for ;)
This was made for my girlfriend Kelly who happens to have her b'day just before Xmas so while everywhere else is festivity mad I'll stick with the normal ;)
I have been playing with the Gelli Plate again and have used several prints to form my card. If you have time it would be great to see you over at De Stempelwinkel where you can see the whole thing.
Thank you all for stopping by and I wish you all an amazing Xmas. xx

Monday 16 December 2013

De Stempelwinkel - Da Vinci Gift


I have up dated this post with the ics as I would like to enter this into the challenge over at Simon Says Stamp Monday Challenge they are having a use a stamp theme to see out 2013.
This was my DT make for De Stempewinkel and all the stamps are from them.
The pencil case was painted with Decoart Paints.A white base coat and some colour washes followed by a thin coat of white that was then sanded back.
The stamping has been done with various archival inks in a random pattern.
The whole pencil case was then sealed with Decoart's Satin glaze.
Thanks for stopping by xx

Saturday 14 December 2013

Decoart - Kids Blocks Gelli Plate Tutorial


So hows everyone doing? Thanks for stopping by, I'm sharing a little Decoart tutorial on some altered kids blocks today.If you have time head on over to the Decoart DT blog where you can find loads of great tutorials from our amazing team.
I wanted to try something a little different this time and with Xmas just a few weeks away they could make a great little present if you know anyone with a little one.

Here is what you will need.


Some Decoart Traditions acrylic paints. I have used Hansa Yellow, Quinacridone Violet and Aquamarine. I have also used black and white Americana. The Decoart paints are perfect for the Gelli Plate
Gesso.
Traditions Satin glaze
Faux Finish Medium
Black Archival ink and some cut and dry foam
A die for cutting letters, I used the Tim Holtz die
Black Card
A Gelli Plate
Stencils, I have used several from The Crafters Workshop
And of course, some blocks, Mine are about 3x3 inches.


I am recycling some distressed blocks that I have had around for a while, I started by giving them a coat o Gesso and let it dry, It was sanded back a little just to smooth them out and then given two coats of white Americana paint to act as a nice clean base.


Now the fun begins, The Gelli plate is something I love but have not really had a good play with but I really wanted to use it on something 3d.
these pictures show the steps each time, the only things changed are the colour and stencil.When working with a Gelli plate it is fairly important to work quick as the paint will dry out, if it dries out to much a couple of squirts with some water and a baby wipe will clean it up.You can add extenders to your paint if you want to but if you work swiftly you will have plenty of time.
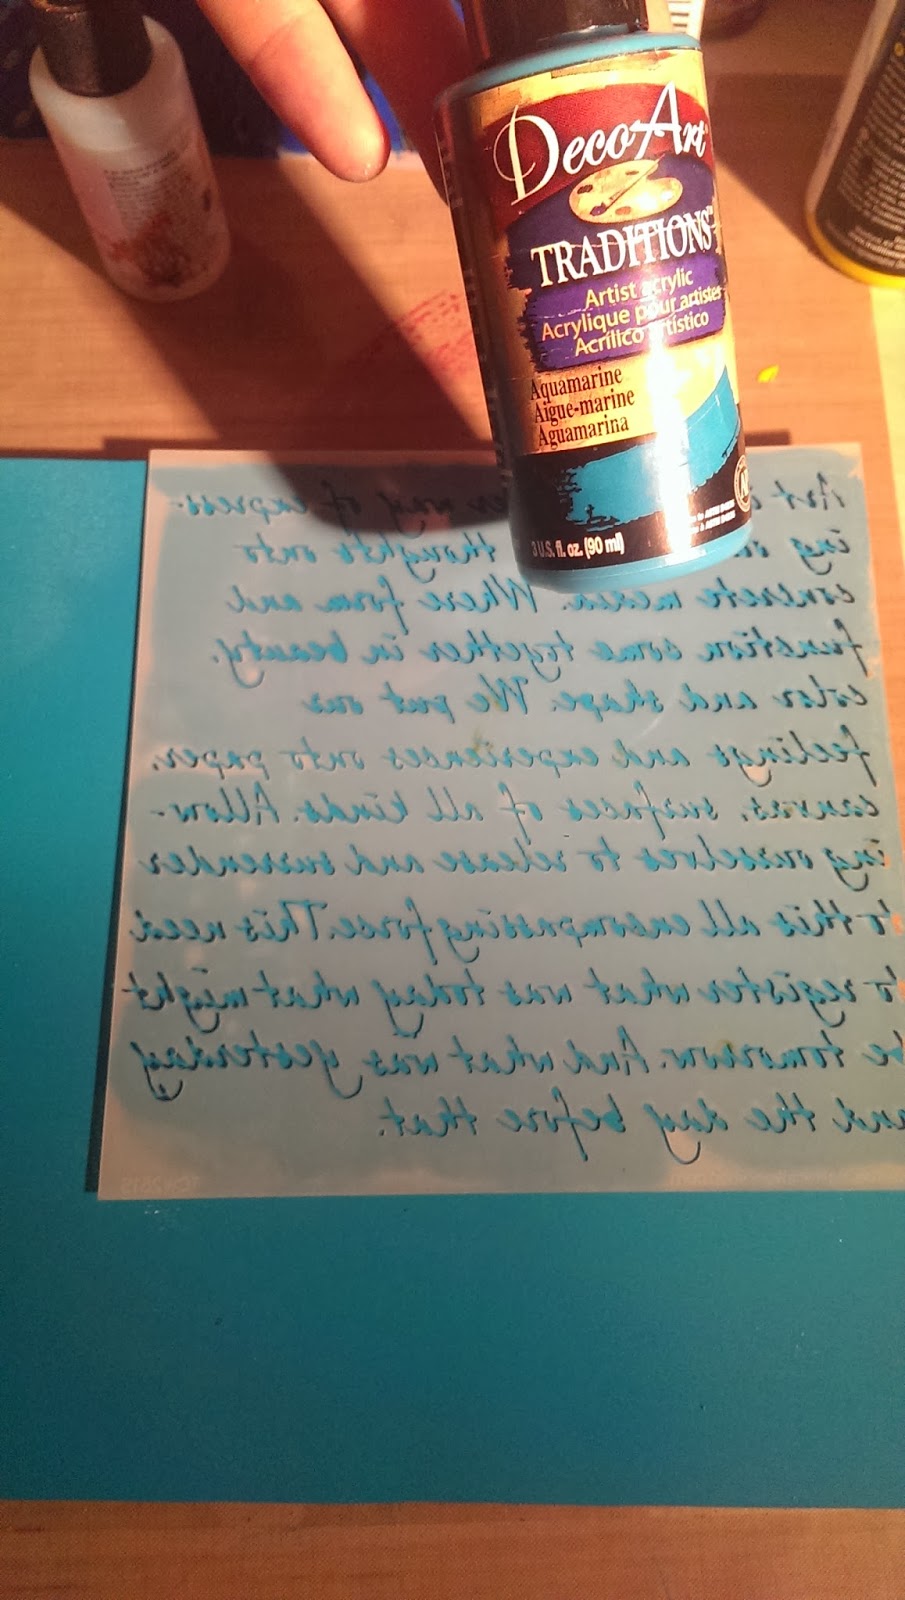
I started with the Hansa Yellow, If you have not used a gelli plate, just add a few drops and spread out with a brayer to get a nice smooth and even surface, I laid my stencils on top of the paint (if you are using a text or a directional stencil you will need to make sure you place it the wrong way down otherwise the print will come out back to front)
Once the stencil was laid down I pressed my block firmly straight down,careful not to have it slip, I did this for all six sides with each pattern.
To clean off the Gelli plate I found the best thing to do is have several sheets of paper, thin printer paper works best for me, and just lay it over the remains of the paint and run the brayer or your hand over the top, this will pick up most of the paint and if you keep using the same bit of paper you can get a lovely build up of colour/images that can be used in other projects (back grounds for tags etc. it's also easier to clean your brayer by running it across a scrap of paper.

I used the Quinacridone Violet next, both this and the Hansa Yellow are transparent so you can get some quite nice colour effects, I finished off using a script stencil and the Aquamarine.If you look carefully you can see the script stencil has been laid back to front.

Here are the blocks after all the Gelli Printing


I edged the blocks by swiping Archival ink with some cut and dry foam and added some black stencilling to the face.


Using the Tim Holtz die and some black card stock I die cut my letters and attached them using the Faux Finish medium,, when dry the whole cube was given a couple of coats of the Satin Glaze, this really helps bring out the colours and gives a more finished look to the blocks, it also helps protect the layers of paint.


Monday 9 December 2013

De Stempelwinkel - Elephant Present and a Thank you.


Morning all and thank you so much for stopping by.It's my turn again over at De Stempelwinkel and today I am sharing this little sneak peek of my Elephant Parade DIY kit.
This will be given to my Girlfriend's brother for Xmas.
If you have time it would be great to see you over there, lots more pics ;)

I would also like to say a great big thank you to all of you that stop by weather it is your first time or you are a regular, It really is amazing to have you here and because of you guys I have had an amazing crafty year and made some amazing crafty friends.
I would like to say thank you to all my Design Teams and all the people/blogs I have been lucky enough to guest for. I have loved every minute of it.
The year has been dreamlike in many ways and continues to grow. A year ago I would never have thought I would be given the opportunities that have come my way,
creating for the stamp company De Stempelwinkel and The Octopode Factory, doing my first tutorials for Decoart. The response has been overwhelming and very much appreciated.
Next year is looking just as exciting as I am now putting some class ideas together and working alongside Tando-Creative (watch this space ;) ) I will also hope to be doing some Demo days with the Decoart products, best keep my fingers crossed that there will be some interest ;)
Thank you to all the gals over at Haunted Design House who gave me my first break in asking me to be on their DT, I love getting my creep on with you ;)
And really a great big thank you to all of you that keep stopping by, None of this would have happened for me if you guys did not keep popping in xx

Ok, soppy bit over with xx
Thanks for stopping by x


Wednesday 4 December 2013

de stempelwinkel - his n hers guft tags


Just flying in posting from my phone again. I'm sharing a couple of gift tags over at de stempelwinkel today and if you have time it would be great to see you over there x
Xx

Sunday 1 December 2013

De Stempelwinkel - Kate Crane style calendar pages.


Morning all, I'm sharing a little peak at my Kate Crane inspired December journal calendar page. The full pages can be seen over at the De Stempelwinkel blog.If you have time it would be great to see you over there x.