Friday 31 August 2012

Craft Barn Die Cutting Demo Day 8th sep

  Hi all, Last weekend whilst I was in my local craft shop,
 The Craft Barn I was asked if I would like to help out and demo the Tim Holtz Vagabond machine at their demo day on the 8th Sep. Now I was asked because they know I have a Vagabond not because Im a whizz of any kind ;)
To say the least I was taken back and after a days thought I decided what the hell lets give it a go.
 Basically on the day there will be several of us showing how each of the main machines work, The Vagabond, the Cuttle Bug, the Grand Calibur , Big Shot, sling shot and pea shooter.  Ok so a few of those may be made up ;)
 All I have to do is show how the machine works with all the different dies that are out there and the sorts of material the machine will cut etc. (not to hard??)
 Oh I also need to make a sample board and some pieces of work giving examples of die cut and embossed pieces.
The first pic is the sample board I have made, It has now been label'd with each of the materials. I have a few past projects I can take along and have made a box and a tag, nothing mind blowing but hopefully they show off die cuts and embossing?

Firstly the tag, I really wanted to make this tag using the same techniques and finishes as an ATC I made for a swap a month or so ago. I used the Tim Tag die and cut out a tag in craft card, two in mount board one in acetate.The craft card was embossed with the metal plate folder from Tim Holtz and painted with a copper patina effect from the Andy Skinner workshop, the 2 bits of mount board were then cut with a craft knife so they became frames, the top one was stained with distress inks and then embossing powders to give it a rusty look, the acetate was stamped with a Paper Artsy steam punk stamp.I also cut a couple of cogs from the Tim cogs die and gave them the same finish as the frame.The acetate was layered in between the mount board so it was raised from the patina effect and recessed from the front of the tag. the cogs were cut and stuck on around the edge. I used a couple of other embellishments to even out the colours a little.
I would like to enter this tag into the challenge over at Catered Crop where their challenge is 'No Stress To Distress'
I think rust and patina'd copper is distressed?? ;)

I would also like to enter it into Card Crafters Circle
their challenge is 'For The Fellas'
And I would like to enter it into Simply Create Too
where their challenge is 'So Old Or Vintage'


And of course there is the DragonsDream Tag It On
challenge 'Art For Arts Sake'


Secondly I made this box, Its a simple little wooden box,I stained the top with distress inks and then stamped over the top in sienna archival ink with a cover a card stamp and the 'love' stamp from Dyan Reaveley. This was then coated with a couple of coats of UTEE. I used the movers and shapers butterfly die, embossed them with a script folder and coloured them with distress inks as well.For the sides I used the on the edge die and used the same colours and stamp as i did for the lid, they have also been coated in UTEE to tie it all together.
For the inside of the box I ran some card through an embossing folder and again used distress inks for some colour but added a little black so it was not quite so in your face. I also added another butterfly for the shear hell of it ;)

Hopefully they show a few of the different dies in use??

If you are about on the 8th Sep and want to see me make a fool of myself pop on down to the Craft Barn It would be great to see you, and if you do know me from Blog land say hi ad introduce yourself x


Thanks for sticking with this post,I do waffle at times. ;)


Wednesday 29 August 2012

The Craft Barn. Blog Candy


Just a quick post to let you know that the Craft Barn are having a blog candy give away, they are celebrating hitting over 1000 followers.For all the details of how to be in with a chance of winning all of this follow the link and check it out.Ill be keeping my fingers crossed for this little lot ;)

Monday 27 August 2012

Haunted Design House Challenge.......'Bad Moon Rising'

 Its that time of the week again.This weeks challenge over at Haunted Design House is 'Bad Moon Rising'
and I hope you will come and check us out let lose your dark sides and have a play in our dungeon ;)
We are sponsored this week by On Cupcake Moon
They do all sorts of custom Invites/cards toppers etc, Definitely worth checking out, They are also giving away $15 of store credit to the winner.
There is something there for everyone.
 Basically the challenge is to include a moon and not make it look to cute ;)
 After 2 weeks of using Copics it was nice to step away and create something a little bit different.      When thinking about Moons my mind jumps to werewolf's (obviously).
I thought it would be cool to change up a simple wooden box and turn it into my werewolf kit.I have some silver bullets, werewolf teeth, a little bottle of Wolfs Bane, on the inside I also have a pic of a werewolf and you can just make out some hair straight from the beast.
Oh and of course I stuck a great big full moon on top of the box.

To make the moon I drew a circle and used Deco Art's crackle paste, this was then stained with blue distress inks and then dry brushed with cream and white acrylic paints, building the colour up as I went along. The main box was coated in Deco Art's texture paint and painted first with a dark brown ( I was going to go for a rusty finish at first, but it looked poo) I then went over with a deep blue and dry brushed with the same blue mixed with white so it bought out all the texture, there are probably 3 or 4 different shades of the blue on there, I kind of mixed as I went.On the front of the box I added a cut down Tando book plate, gave this a rusty finish with distress stains and distress embossing powders, added the word 'Lycanthrope' which is another word for werewolf, also it helps break the blue.
The mini Tim bottle was painted with an Andy Skinner Technique from the elixir workshop.The teeth were also done using an Andy technique, they are a couple of teeth bought in one of those Hippy native american type shops and a funky shaped stone, they were all a bleached white colour to start with.
The bullets I picked up at an army surplus store, all I needed to so with them was paint the bullet part with silver alcohol ink.
Inside the lid I added a pic from the internet, I distressed it with distress ink pads and added a paper clip with some stained string to make it look like fur.

Thanks for stopping by, Hopefully I'll see some of you over at Haunted Design House
Holidays are over now so I shall be getting back into the swing of things and shall be visiting more blogs and making more pieces
Happy crafting and see you soon,    Mark


Monday 20 August 2012

Haunted Design House Challenge


Evening all, or morning depending on where your at ;)
A slow week here last week, summer holidays and work still getting in the way of some good crafting.
However I have got this done, Its my DT piece for Haunted Design House
  This week our theme is 'Who are you calling a Succubus?'
And we are lucky enough to have KennyK sponsor us this week,They are Giving away 2 designs to each of our Gruesome twosome (top two)
Their Digi stamps are very cool, great characters, lots of styles and genres to have a look at,steam punk through to cutie glam chicks.

 So what's a Succubus???

In folklore traced back to medieval legend, a succubus (plural succubi) is a female demon or supernatural being appearing in dreams, who takes the form of a human woman in order to seduce men, usually through sexual intercourse. The male counterpart is the incubus. Religious traditions hold that repeated intercourse with a succubus may result in the deterioration of health or even death.
In modern fictional representations, a succubus may or may not appear in dreams and is often depicted as a highly attractive seductress or enchantress; whereas, in the past, succubi were generally depicted as frightening and demonic.


I chose the image 'Lady Victoria' from the Steampunk/burlesque set. I thought she made a great temptress?
It was another one of those challenges where I needed to use Copics (dang it) I love them but find it a real struggle, I am quite pleased with the end result but know there is a long way to go, If you check out my fellow DT members you will see what I mean. Some really cool stuff.
As Victoria was meant to be a demon I used shades of blue for the skin and other than a little red i went with the warm and cold shades of Copics for the clothes.
I did not want to do a card so decided to do a door hanger instead (maybe I need more friends who require cards??)  ;)
I am really pleased with the background, I used distress inks to stain the wood, I used the bright oranges and yellows with a tiny bit of red. The image is a 'cover the card stamp', I inked it with Sienna Archival
to give it a nice subtle back ground image and to keep it in the warm colours as the main image is Cold.I then went around the edges with black distress ink just to give it a shadow look and a bit of age.
I printed the phrase off and attached it with adhesive pads just to raise them slightly.Finally I used a red and black feather charm I had and pinned it to the door hanger so as to balance the  main image.

The photo's are not really doing justice to the colours, in some lights it has a really vibrant red sheen to it and in more subtle light it takes on the orange hues.


Please stop by the Haunted Design House and come play in the dungeon with us.  Its always good to let the dark side out for a bit ;)


Thanks for stopping by and or becoming a follower and reading the waffle. I love reading all your comments.

Thanks, Mark


Monday 13 August 2012

Haunted Design House Challenge

This week at Haunted Design House the challenge is 'Hiding in the corners' basically adorn the corners of your project with something.
We also are lucky enough to be sponsored this week by Stitchy Bear  They are a great Digi art shop selling loads of designs from different artists and with lots of different themes, not just gothic horror but some cute stuff too. Go check them out.
They are also offering $10 to spend in their online shop for this weeks winner.

 So after Fridays news about becoming the latest member of the Haunted Design House Design Team they have decided to throw a curve ball at me from the get go.
Digi Images, Ok, so I know what these are and I have been looking at them going I wish these were rubber (my computer skills are pap) I have no real idea how to use them but I like a challenge. When I found out about the Dt and then got the list of the challenges I booked myself on to a copic's class at the Craft Barn. Just in time too.
This is my forst real play with digi stamps. I made the atc first. the image was scaled down and printed out, I then ran it through the Tim Holtz ATC die. I coloured her up with copic's, going for grey skin tones with just a touch of colour on the shoes and hem of the dress.
I then painted over her with matt glue n seal which acts as a resist I also added some around the edges/corners,I could then go in with the distress inks for some background colour.In the corner of the Atc I used some black brads and some eyelets, to finish it off I used a spider charm that was inked with alcohol
inks and then hung through the top eyelet.
 The tag was done in the same way, I wanted a matching pair, the only addition was the spider web which was made with the Tim Holtz Halloween spider web stamp which I stamped onto shrink plastic and shrank.

 If you want to let your dark side out for a little play come and join us and see what happens ;)

I will be entering this into the One Stitch At A Time challenge blog where their theme is 'Anything Goes'

Thanks for stopping by, always love reading the comments.They mean a lot.


Friday 10 August 2012

Haunted Design House News :)

Ok so for the last week I have made reference to a bit of news.
I can now share,
 I have been asked to be part of the Haunted Design House  Design team. I am over the moon about this as it's my first design team.
 I have been taking part in their challenges since starting to blog about 3 months ago and it's a great place to visit and take part in their challenges it really lets me let loose the darker side ;)
I'm so happy to be part of their team and very grateful they have asked me to come and play in their dungeon and If you guys ever want to let your darker side rise to the surface please come and join us in the weekly challenges!

This weeks challenge is 'Insidious inspiration'  basically use the picture on the right to inspire your project, whether it's a card,tag, mix media etc
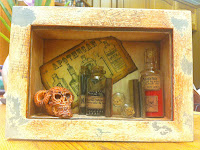
Here is what I made using the pic as my muse.I have gone for an old shop window type of display. I painted the skull and used washes to give him some depth, the shadow box frame has been painted with a technique learnt in the Andy Skinner online workshop, I have also stamped onto the frame with one of Tim Holtz's texture stamps.The Bottles are from Tim and the lables are from & gypsies, they have been scuffed and aged a little with distress inks.
I made a couple of tiny books, these were very simple, I just folded some card, covered the front and back with the Tim sticky tape and stained them with distress inks, I coloured the spines with walnut stain to make them look like old bound Journals.
The inside of the box was covered with a paper from graphic 45 and The apothecary tag is also from one of their sheets. The main background was cut in one piece, distressed and folded to fit inside the box, the tag was also distressed and glued into place.
I have taken the pics while the glass was out as the glare was not helping ;)
Thanks for stopping by and I hope you join us over at the Haunted Design House

I'm going to enter this into Simon Says Stamp And Show where the challenge is paint it up.  both the shadow box frame and the skull have been painted.

Wednesday 8 August 2012

WOYWW 166

Morning all, It's that time of the week, WOYWW want to know what that is???  follow the link, its the weekly blog hop letting everyone have a good nose around.
Its been a couple of weeks as I have been on my Hol's a great trip to Las Vegas. Managed to check out Viva Las Vegas Stamps when I was there, a wierd little place crammed full, and I mean full of their own stamps.
On my desk this week there are a few stamp sets I picked up whilst away and a few ink pads just poking their head in shot. Under the stamps you can just see what I have been working on, I have been busy since getting back but can't post just yet,
Should be sharing my little bit of news on Friday.
Happy hopping, Mark xx

Thanks for stopping by, really appreciate all the comments. xx

Saturday 4 August 2012

And now for something completely different


Yes it is me, My account has not been hacked, ;)
Today I attended a copic's class at the CraftBarn held by the talented Jane Collman, I have done very little in the way of stamp and colour even though this is what I thought crafting was about in Jan.
I have a few projects coming up where I am going to have to use copic's (or at least try to use copic's) and the standard out there is so high I thought I had best be told how to use them.The class was very informative and great fun, I learnt loads and am now much happier about using the pens than I was before. Still lots of room for improvement but that's just crafting.
Poor Jane had to contend with a bloke turning up for a class last minute, the samples were all beautifully done with brightly floral card and lots of colour, No distress inks in sight. Thankfully after I coloured up my gourjuss girl my way she managed to grab me some paper that was a little more fitting.  I am really pleased with how she turned out and the over all look of the card. I even managed to keep it clean.Its nice to do things out of your comfort zone at times. But oh how I miss my distress inks.

Thanks for reading and popping by. Must go off and work on the other projects, A little bit of news to come in the next few days/weeks ;)

Thursday 2 August 2012

Gothic/ Horror Atc's


Right, time for a jet lagged post. Just back from my holls and the back to work blues are setting in.
Just before I left I sent these off to Carmen, we have been meaning to swap since the 3rd woyww birthday and I finally got around to finishing mine.
I wanted to make and Atc in the same way I did the arches for a book cover I did a while back.
The arch it's self is from Tando Creative, they do great chip board images and I love using them.This arch was given a really thick coating of Deco art texture crackle paste.  when it dries it looks like cracked plaster of paris, I painted it black and then dry brushed it to make it look like old stone. I used alcohol inks to colour up some photo paper oranges and yellows, the image stamped is from one of Andy Skinners latest stamp range.
I got the figure from a shop called 'Games Workshop' they sell models for playing some kind of game. I saw this chap in their window.Turns out he is scenery from a Lord of the rings game. They don't sell him on his own but the guy took him from the set up and told me to run ;) ( he was the manager, so don't worry  )
I cut him from his base and gave him the same paint treatment as the arch and stuck it all together. Thanks to Carmen for the pics, as I forgot to take some before I sent them out. Dough!!
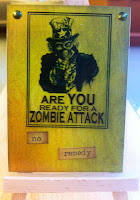
The second atc was stained up with distress inks in green yellow and orange. It was then stamped with a wood grain stamp in a light orange archival ink (think you can just see it in the first pic. The zombie image I first saw on someones Blog  Glow's I think????  and found the image on line, I printed it on to acetate and attached with a couple of brads. I also stuck on a couple of words from the Tim Holtz words pack.

Over at Haunted Design House their challenge is freaker's free for all, so I thought I would enter these.

Regular service will resume soon. thanks for stopping by, Mark