Ok so this was a little out of the blue, I got a lovely comment from the very tallented Julia yesterday at http://julialsw.blogspot.co.uk/ saying she has nominated me for a blog award.
Its for new blogs and seems to be a pay it forward sort of thing. Ill detail it in a minute. For some reason I can find nothing about it online, must be some sort of masonic crafting order ;)
Now I had no idea things like this existed so It was such a fantastic surprise and something that means a lot.
The idea behind it seems to be, you are nominated by someone, you then If you want to, should select 5 blogs that inspire you etc and contact them letting them know about the Child's Shoe award and then they should do the same thing etc, etc. It is a way of socially networking I guess and getting your blog name out there for new people to see.There are some criteria that need to be met, see below.
If that makes sense you are doing better than me.
1. The blog should be in its infancy ie. below 200 followers.
2. The recipient should post about the award on their blog.
3. Include a link to the nominator in your post.
4. Forward the award to another 5 bloggers and tell them about the nomination.
5. Insert these rules into your post.
After a lot of thought I have chosen 5 of the blogs that were probably 5 of the first blogs I came to when I started out earlier this year. They are blogs that I constantly go to to see what wonders they have created and am constantly inspired and amazed by their works.Sadly I could only choose 5 Blogs, there were so many I wanted to include.
Here are my 5 in no particular order.
Mel.................http://theyorkshirefox.blogspot.co.uk/
Elly..................http://ellypirally.blogspot.co.uk/
Fiona..............http://myartfulmuse.blogspot.co.uk/
Anne..............http://bollyanne.blogspot.co.uk/
Alison.............http://alisonbomber.blogspot.co.uk/
If you don't know who these guys are go check out their Blogs,also go and check out the very talented Julia as well. I am sure you will be inspired
It's all a little weird but hey, weird can be good ;) time for me to let my 5 know, hope they don't mind x
thanks for reading, sorry for no crafty things, but to make up there will be 2 posts tomorrow (oh yay I hear you scream) ;) x
Sunday, 30 September 2012
Wednesday, 26 September 2012
Haunted Design House, Great Granddads Merman Heart
Im a little late this week as I have been rummaging through great granddads things in the atic.(for those of you who don't know, my GG was an old school monster hunter) I found this, an old box padlocked and chained shut.Its scuffed tin and metal plate so Im guessing it must hold something substantial. Luckily the lock was old and I was able to break it open and look inside.
it is solid it has a liquid like look.
Fortunately the box was numbered and I have been able to find some journal scraps that seem to correspond with this item.
According to the page this once belonged to a great warrior of Atlantis.Now unfortunately there are no details I have found as to why GG was anywhere near Atlantis or how he came about this warriors heart, but I can only assume that it is either very powerful or very dangerous, I think I shall lock it back up and wait till I can find out more about it.
This started out as a wooden cigar box I was able to get hold of in Vegas earlier this year. The challenge being chained up my mind went to some sort of artefact that needed to be kept under lock and key. To see some other brilliant interpretations of the theme head over to Haunted Design House and have a play with us.
I was really pleased with how my tag turned out last week and wanted to use the same techniques but in a different way.The box was painted with an Andy Skinner time worn technique and I made four rusty plates to attach to the sides, the chain,lock and fasteners were picked up in Homebase.the lock was coated in a mix of alcohol inks and thinned down washes of paint, the fasteners were also given a rust treatment.
The inside of the box was lined with some patterned paper and some old black cloth was folded for the lining.
As for the Heart, It has pretty much everything I own thrown at it. I started with Fresco paints and then some clear crocco crackle glaze, this was dry brushed with different shades of blue, It got misted with dylusions and cosmic shimmer mists, a layer of wax was added along with some blue alcohol inks that got melted in with the wax, more cosmic shimmer and finally some clear stickeles. yes i have some of them.
the end result is quite weird, it has a sort of very thick soft varnish look about it, you can see through the layers to the wooden heart underneath.It just proves if your not happy with something add another layer ;)
If you have made it this far then you deserve a medal. I am so greatful to all of you who take the time to stop by and see what I am up to. It's still unbelievable but very much appreciated.
thank you xx
I would like to enter this into the Anything But A Card challenge, the theme is 'Texture'
I would also like to enter this in to the challenge over at Simon Says Stamp And Show their challenge is 'for the love of sparkle' the heart is my sparkle'y object. I would also like to say a great big thank you to the guys over at ssss as I was lucky enough to win $100 in their weekly entry draw, I have already spent it and received my stamps. Thank you xx
Friday, 21 September 2012
Steam Punk Tag Swap with InkyPinky
A little while back I was chatting with the very talented Trace from Inky Pinky Craft, go have a look at her blog if you do not know who I am talking about, and we decided to do a tag swap, Trace set the Theme 'Steam Punk' and earlier this week we both received our tags.
I really enjoyed the whole swap experience but have to admit to being nervous swapping with Trace as her work is brilliant.Having said that I am actually really pleased with the way my tag turned out, being steam punk it cried out for Andy Skinner techniques in abundance so I threw a few at this project.I started with a tag cut from mount board using the Tim die cut, this was embossed with the diamond plate folder and then given a rust treatment, I then used a different worn metal look for the main image,its meant to look like chipped/scraped tin. The stamp is from Oxford Impressions.I used some embellishments from Tim Holts, The tap and sentiment, the
I am really liking using mount board over normal card at the moment as it gives a better base for paining and also gives extra depth.
The ATC image was stuck on with double sided pads to lift it from the surface of the tag.
Now here is Trace's tag. Its absolutely brilliant,I love it all, The embossing folder is one of my faves, it really lends it's self to the steam punk theme.What you can't see from the main pic is the crackle texture on the light bulb and all the curled bits of wire that have been attached. Also the wing nut for the eyelet is genius, really cool.
If you click on the smaller picture you should see what I am talking about with the bulb.
The Monty Python hand image has been curled so it is proud of the tag, great little details.
If you look on Trace's blog you will see more about her tag and some other projects that are inspirational.
Also look at all this stuff Trace put in as well, talk about being spoilt ;) loads of die cut cogs and some brilliant embellishments, charms and keys.
A big Thank You from me Trace, I cant wait till the next swap, something spooky maybe? ;) stay tuned for swap 2 lol
Also a big thank you to everyone who stops by and leaves comments, It really does mean a lot xx
Right over at Poisoned Peas Please they have a Steam Punk challenge which is mighty convenient ;)
And Anything But A Card have a texture challenge running.
I would also like to enter this into a new challenge blog called Steam Punk Junkies their challenge is Time Travel/Anything Goes.
Monday, 17 September 2012
Haunted Design House 'I'm Melting'
It's that time of the week again but first a thank you to all of you that stop by, Hi to to the regulars ( how weird is that?) and welcome to you if it's your first time.
Ok back to that time of the week again, I am of course meaning the Haunted Design House challenge, this week it's 'I'm Melting'
basically create something a little dark/gothic or halloween inspired using the theme melted.You can interpret this anyway you choose, There are loads of great DT pieces to get your creative juices going over at Haunted Design House.
When I knew we were doing this challenge my mind went straight to my melting pot, I have only used it a few times but I really love playing around with the melted wax. I have found it to be a medium that just lets you play, you can just layer up and layer up until you like what you are left with, if you make a mistake or don't like an area you can just go over it with the next layer of paper etc.
Right, so I chose to do a small canvas about 6''x8'' I started by spraying the canvas with Dylusion sprays, pink and orange going through to green blue and purple, at this stage it was BRIGHT but I new when the wax goes on it would mute it down a little, I sealed that with the first layer of wax, added some streaks of alcohol ink which i covered with wax before it had dried so it smeared and streaked in with the wax (make sense?)
I stamped one of my new Stampotique stamps on to white tissue paper and layered it on, I was hoping for the tissue to become more translucent but you could still see it so I re stamped the image onto another bit of tissue paper and then sprayed with the Dylusion inks and stuck it down over the top of the first image, you can see the first layer poking out from underneath in a couple of places.I used some Tim tape for one of the edges and corners and stained them with distress inks to get rid of the stark white look. I also used one of my Dyan Reaverley saying stamps 'Until you spread your wings you have no idea how far you'll fly'
Its one of my favourite quotes and fits the Stampotique image really well.I finished it off with a Fleur de lis I cut out of grunge paper using my sizzix die, it was stained red with Dylusions and then embossed and highlighted with distress inks to match the other colours.As it's quite a thick medium it took a liberal amount of wax to get it stuck down but it all adds to the overall texture and depth.
The pics have not really done this justice, because of the wax I was getting glare like no ones business, If anyone knows how to take these pics please let me know ;) x
I would like to enter this into the Simon Says Stamp And Show their challenge is 'Tape It Up' I used the Tim Tap in their. Also a big thank you to them, I was so lucky the other week, I won the draw for the $100 Ten year b'day draw.
I would also like to enter this into the challenge over at Anything But A Card their challenge is 'Texture' oh and of course, not a card. Yay. they are a new blog, this is challenge No 2 I love not making cards x ;)
Over at Lexi's creations they are also having an 'Anything But A Card' challenge.
Wednesday, 12 September 2012
Haunted Design House Challenge. Oh my Gourd
Well its past due that time for this weeks challenge over at Haunted Design House.
I have been a little busy this week so I am making the 'wretched wednesday' posting.
The theme this week is 'Oh My Gourd' we are getting in the mood for Halloween early over at hdh and we require you to base your project around Pumpkins. Now you can either carve a pumpkin,stamp with pumpkin stamps, paint a pumpkin etc etc etc. I'm sure you all get the idea.
We have a wonderfully creative and timely sponsor this week!!
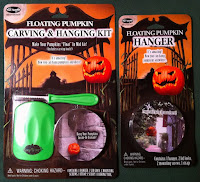
Funworld's Floating Pumpkin Hangers
These are called Floating Pumpkin Hanger kits.
Very cool concept and pretty simple to put together.
These look awesome in a grouping and the website has lots of
photos and design ideas. They are available through Spirit,
Amazon, and possibly other online retailers. A simple Google search
should help you locate them in your area. They even have a Face Book page.
I have been a little busy this week so I am making the 'wretched wednesday' posting.
The theme this week is 'Oh My Gourd' we are getting in the mood for Halloween early over at hdh and we require you to base your project around Pumpkins. Now you can either carve a pumpkin,stamp with pumpkin stamps, paint a pumpkin etc etc etc. I'm sure you all get the idea.
We have a wonderfully creative and timely sponsor this week!!
Funworld's Floating Pumpkin Hangers
Very cool concept and pretty simple to put together.
These look awesome in a grouping and the website has lots of
photos and design ideas. They are available through Spirit,
Amazon, and possibly other online retailers. A simple Google search
should help you locate them in your area. They even have a Face Book page.
I have made a very simple tag and atc this week, The tag was made using the Tim Holtze tag die, stained with the orange distress pad and stamped over with a 'cover the card' pattern stamp in vermilion archival ink.The skull and pumpkins were stamped in Black archival and are from the new Paper Artsy Halloween sets.
The bat, cat and pumpkin were given to me by my Blog friend Elly when we swapped some ATC's they were given coat of black distress ink and then clear embossed with UTEE.
The ATC was given the same orange stain and stamped with the same cover a card stamp, the pumpkin image is again from paper artsy. It was then covered in UTEE to give it that glossy look and to really bring out the orange colour under the black.
The pic is not great as it's a glossy surface.
Even though they are simple I quite like them, I normally like to do more but sometimes less works just as well ;)
We would love to see you over at Haunted Design House, there you can see the hangers in action and all the really cool projects from the other DT members.
Thanks for stopping by, x
Sunday, 9 September 2012
'Love' challenge piece
Hi very quick post at the moment, as I am cutting the deadline close, the challenge over at Simon Says Stamp And Show this past week is/was 'Read All About It' (And it's my b'day so need to get out for dinner.)
Here is what they have to say about it
'Read All About it: Do you love text patterned stamps and papers? Have a book that you’ve been meaning to alter? Want to cover a new journal front or use a book as inspiration for your next project? Please do share! This week, we’re all about words. Whether it’s from actual book pages or just inspired by, projects with a newsprint accent or that are classic literature inspired - we can’t wait to see what you’re up to this week.'
It is also their 10 year anniversary so a Big congratulations to them and good luck for the next 10 years.
As you can probably guess I have chosen the word Love.
I started off with an off cut of chipboard, I ran some card through the diamond plate folder and gave it a rusty finish with an Andy Skinner technique, I also used the Tim Holtz 'Love' movers and shapers die and slid a bit of alcohol ink stained card behind, to make it pop a bit more, almost a burning furnace look to it?
The big Love at the top was picked up in Brighton and was just a plain white wooden word, I used some watered down acrylic paint and went over it randomly to give a worn and stained look. I also stamped it with a Tim Holtz stamp, just the alphabet in type writer font, sorry can not remember the set.
The heart was also picked up in Brighton, I painted it and stamped it with one of the 'love' stamps from Dyan Reaveley, it was then dry brushed with some brown to pick out the texture and edges, finally sprayed several times with the bubble gum pink dylusion spray.
The Tim Holtz book plate was painted with a copper verdigris finish, again a time worn technique from Andy Skinner, I think it is one of my fave finishes at the moment.
Oh almost forgot after sticking the diamond plate card down I stained up some advertising text paper with blue distress inks, dabbing them onto my craft mat, spraying with water and then dragging the paper through and ironing dry and flat.I then tore away the areas to show the rust and glued it down, it was then covered with the 2 stage crackle medium but I think I got impatient as I was helping it along with my heat gun, ( don't think it helps) instead of lots of cracks I got almost tear like texture going on, hard to describe, to hi light it as much as I could and to give it an even more aged look I rubed some dark brown acrylic paint all over and into the tears/cracks and the wiped back the rest with baby wipes.
the finish touches were the Tim Holtz tickets, they were given the distressed ink pad treatment and glued on.
I would also like to enter this into a couple of other challenges,
over at Challenges 4 Everybody their challenge is anything goes
I would also like to enter this into Anything But A Card they are a new blog and I have to say Anything but a card suits me as I really do not like making cards at all ;) their challenge is anything goes as well.
It's also anything goes over at the Joyful Stamper Inspire Me Friday they also have a great idea for making a pumpkin out of air con duct. very cool.
Thanks for stopping by and leaving your comments. x
Monday, 3 September 2012
Haunted Design House. Bare Bones Challenge.
Well its that time again where over in the dungeon at Haunted Design House we have been whipped until we come up with something viable for the weekly challenge.The challenge this week is 'Bare Bones' basically no adornment's ( no frills, embellishments brads etc) Oh and the usual expectation of it being a little on the dark side even if it is cutesy dark ;)
Now at face value this sounded easy,and until I sat down to work I was under that misconception. After a few false starts I finally came up with this and I have to say I kinda really like it.I went with the KISS philosophy (keep it simple stupid)
I started out with a 6''x6'' chunky wooden frame, the back of this is also wood and is a one piece thing.
I used Paper Artsy acrylic paints, first an olive green base and then one of their translucent greens slightly darker put on as a wash.When this was dry I used Deco Arts two stage crackle effect and rubbed some brown in when it was dry, I picked this technique up from Andy Skinner at the Craft Barn demo day. If you have not checked out his work please do, there should be links on the side of my blog. for the inside of the frame I took some white craft card and cut it to shape, I then stained it up with distress inks applied to my craft mat with water added and the paper drawn through it a few times, Its a finish I have used a few times and was then shown just how versatile this effect is by Neil Walker To finish it all off I got to use one of my new Stampotique stamps. Arn't they just the cutest ;) lol
The other photos are just to show the crackle effect off a little better, my photo skills still need some work.
As always thank you so much for stopping by, I hope you leave a comment as I love to read what you have to say.
Also a great big THANKS for all the support and encouragement.
So all you have to do now is pop over to the Haunted Design House and have a play.Would be great to see you there. x
I have had a good search around this eve for different challenges to enter.
I would like to enter this into the challenge over at Creative Stamp Friends their challenge is 'distressing'
I would also like to enter this into the challenge at Lexi's Creations the challenge their is 'Autumn Colours' I think drab green and browns have an Autumn feel about them.
There is a brand new challenge blog just starting up, Anything But A Card the challenge their is 'Anything goes' as long as its not a card ;) My kind of challenge blog ;) Do I not like cards ;) ;) x
I'd like to enter this into The Artistic Stamper the challenge this time around is 'Splatters And Speckles'
The back ground for the main image should count as speckled and splattered?? x
Subscribe to:
Posts (Atom)