Pages

Friday, 28 June 2013

De Stempelwinkel - Chat Noir


Ok, so hands up, who is ready for the weekend?
 Its once again my turn over at De Stempelwinkel, Follow the link to see the full project and a whats what of what I did x
And remember they have daily posts from the Dt show casing the awesome range of stamps available. There really is something there for everyone x.
Thanks for stopping by xx

Monday, 24 June 2013

Haunted Design House - 13 elements

It's that Monday time again and we are starting another challenge over at Haunted Design House.
We have a bit of a tester this time round, We are challenging you to use a total of 13 layers/materials/embellishments.Now this one had me ripping my hair out last night, the best part of the eve was spent making something that just did not look right in the end so wound up in the bin.
 Luckily I had Edward here ready to go.
 Here is my break down of my 13, I might be stretching slightly but hey ho ;)
1.) Base card for Tag
2.) Material for the texture finish (see Andy Skinner Book Of Ruination)
3,4.) Black andGrey Decoart Acrylic Paint
5.) Treasure Gold Topaz Rub n buff stuff.
6.) Card for Edward
7.) Tim Holtz Chit Chat Sticker 'Imperfection'
8-12.) 5 different shades of Copics
13.) The clear embossing over Edward.

Ok I did say I was pushing the limits of our 13 challenge but that's just how we roll in the dungeon ;) lol.

Luckily Edward fit this challenge, he can also be found over at Lily's Octopode Factory Etsy shop as the sample for the Edward Scissor Hands Digi Image.

Head on over to the Haunted Design House to see some great pieces from our talented Design Team and how they have interpreted the theme.
 Thank you for stopping by and hopefully we will see you joining in??
xxx


Friday, 21 June 2013

The Octopode Factory - Summer Themed Challenge.

Welcome. Its great to have you stopping by, Id like to say a big thank you for being here.
 Well another two weeks have passed and this means it is time to start our new challenge over at The Octopode Factory and with all the nice weather we have been having here in the UK, Well my little corner of the UK has been nice ;) It is time for a summer themed challenge.
Follow the link to see what the rest of the DT have created and of course as always I would love to see what you can come up with. You do not have to use an Octopode image but if you do your name goes into the prize draw twice.You can grab the digi images in The Octopode Etsy Shop and a lot of the images are available in rubber too, best to contact Lily via her blog HERE.


 For this challenge I decided to do another art journal page, as you can see I am making my pages separately , I really hate getting bleed through from new pages onto old pages that have been finished, this way I can just collect them all together and bind them later on.
My page has been cut from mount board and sprayed with Dylusion sprays, I have mainly gone with yellow but thrown in a little orange and a tiny bit of green as well.I have used a sentiment from Dyan Reaveley stamped in black archival and I have also used one of her leaf stamps stamped in pale ochre archival ink.
The Octopode images I have used are the Steam Punk Sun, Dorothy and several of the Octopode flowers.
They have all been coloured with Copic's, fussy cut and clear embossed before being glued into place. I finished off by using black soot distress stain around the edge.
Thanks again for stopping by and a big thank you and welcome to my newest followers, it is lovely to have you here. xx

Wednesday, 19 June 2013

Exterminate!! Tando-Creative altered advent calendar


 Happy Wednesday, Second post for me today so thanks for sticking with me, as always it is so great to have you stop by.x

 Now this project goes back a little while, Whilst at the Ally Pally craft show in April having a good look round I got to chatting with Di Oliver of Tando-Creative and Helen Pigott from Its Crafting Time who had been discussing alternate uses for some of the Tando range and that the xmas advent calendar looked a lot like a Dalek, I think it was right place at the right time as I was then given the challenge of turning the tree into the Dr Who villain.
 A little while later I received the kit and set to work figuring out what I needed to do. The kit it's self goes together really easily, this little pic shows how the tree looks un painted and the next one is of a tree fully painted up as an advent calendar, I gave mine a Tarnished Brass finish using Decoarts Acrylic paints and  one of Andy Skinners  on line workshop finishes from Time Worn , details can be found on his blog.
I needed to make a couple of sections for the conversion and after a couple of fails found the right way to make the sections I needed, the dome is from an old telephone bell and the mesh has been cut from some magic mesh and glued down after being painted with decoart paints. The arms are kebab sticks and a tooth pick has been used for the top arm thing.
I wish this had been my idea but I had so much fun creating this, I can already see ways of making it better.
 Now if you do not know who Tando-Creative are follow the link to their blog, they are a UK company that produce brilliant chipboard parts and kits, there should be a product range on their blog as well as a list of suppliers.


I would like to enter this into the challenge over at Simon Says Stamp And Show, they are having a 'Kraft' theme, Im not 100% sure what that is but chip board was mentioned and this has been made from a chipboard kit so hopefully that counts x

Anything But A Card are having a 'Masculine' challenge.

Crafty Cardmakers are having a 'Steam Punk' challenge.

The Stampotique Designers Challenge are having a 'Anything But A Card' theme, I looked at the rules and could not see anything about having to use a stamp so hopefully all is good.

Left Of Center are having an alternative or Embossing challenge.

Punk You Girl Are nearly finished their first challenge, the theme is 'Anything Goes' and they are a new alternative challenge.


De Stempelwinkel - Dali Tag


It's my turn over at De Stempelwinkel and I am sharing a Dali inspired tag. Head on over to see the full tag and some more pics as well as what I did. x  Thanks for stopping by xx

I would like to enter this into the challenge over at Left Of Centre their challenge is Embossing or alternative. 

Tuesday, 18 June 2013

Fun With ATC's - Flowers


Its that time again over at Fun With ATC's to start our new challenge, The theme this fortnight is Flowers.
I have a very simple Atc this time round, I used a beautiful poppy stamp from Crafty Individuals, I stamped with memento black ink and coloured the poppy with Copics. The coloured areas were then painted over with some glue n seal and when dry the bg was coloured with distress inks to give a vintage feel.
The words are from Tim Holtz chit chat sticker book. They have been embeded between layers of clear UTEE, there are three layers in total.
It would be great to see you over at Fun With ATC's and to see what you come up with, head on over to see what the rest of the DT have created for your inspiration.

Sunday, 16 June 2013

BlogLovin

Well looking around a little bit and it seems Blogger is making changes for some reason, Why when you have something that works and people understand, you feel the need to get rid of bits makes no sense but Hey, what do I know?
I see a lot of people are adding this Blog Lovin thingy,
<a href="http://www.bloglovin.com/blog/5210125/?claim=fhsq4gh5q3m">Follow my blog with Bloglovin</a>
I hope I can understand it soon, I do not want ot miss out on any of your blogs and I would love for you to stick with following me x

Tuesday, 11 June 2013

De Stempelwinkel - A simple summer tag


Its My turn again over at De Stempelwinkel, I have a nice and simple summer tag, here is a little teaser ;)
full pic is up on their blog, Link HERE x  thanks for stopping by x

Monday, 10 June 2013

Haunted Design House - Holey Moley,Put a hole in it.


 It's time to get your freak on ;) We are starting our new challenge over at Haunted Design House today, the theme is 'Put A Hole In It' (at least one),For the next two weeks you can enter any project you like, the darker the better ;) as long as it has at least one hole.Head on over to HdH to see what the other Minions have in store for you an remember to check back next Monday to see some more inspiration for this challenge.
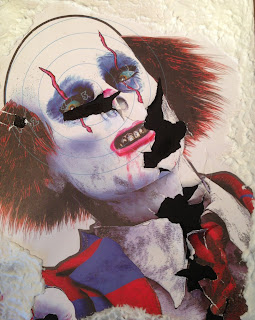
 After a little thought about how I could add holes I came up with this and dug out my paper targets from my visit to the Las Vegas gun store a couple of summers ago, I had an absolute blast and did the Zombie Hunter pack, I got to shoot 4 guns that are in pretty much every Zombie killing computer game (yes I am a nerd)This target Is my Zombie Clown target and I used a Police Issue Shot Gun to add my 'Holes'I cut a piece of ply wood to size, About 12"x16" ish and cut my target to fit, It was glued to the wood with Decoart's decopage glue, when dry the holes were showing the wood so I painted them in with black acrylic paint.I used Decoart's modeling paste around the edges applied with a pallet knife and this picture shows how it looked before any colour was added.                                       I started by applying different colour washes of Decoarts Traditions acrylic paint, I used Quin Gold,Quin Violet and Phthalo Blue. All three of these colors are transparent  so I knew the image would be seen through the paint, When the washes were dry I used the same colours only neat and painted over the modeling paste and blended the colours into the main image to tie in with the washes and to give more depth to things.
 A little bit of Dark red paint was flicked across the face to add more blood splatters. The modeling paste was high lighter with some Treasure Gold In emerald green to give some contrast to the warmer colours. Once the paint was dry I sealed the image with some matte medium and then used the Decoart one step crackle finish. With this you need to apply it really quite thick and then let it self level, I poured quite a lot of it over the main image and spread it around with a brush, pulling it in all directions and leaving it thick in places and very thin in others, some places missed completely as I wanted more of a random look to the finish, the areas with the bigger cracks are where the one step was thickest. When it was dry I rubbed some acrylic paint into the cracks and wiped away the excess with a baby wipe.
To finish off I used one of Andy Skinner's new stencils and ran some black modeling paste through it with a pallet knife. and when it was dry I used more of the Green Treasure Gold to Highlight the paste.Hope he does not cause to many nightmares ;) Thanks for stopping by it is always fun having you here. Hopefully we will see you over at Haunted Design House taking part. x

Punkyougirl are having a anything goes challenge, they are a new gothic/fantasy challenge blog just starting up with their first challenge.


Friday, 7 June 2013

Octopode Factory - Slugs n Snails, something for a boy. Super Hero pen pot

Happy Friday everyone, and thank god, I can not wait for the weekend.
Over at The Octopode Factory we are just starting our new challenge, something for a boy.
 I have done another pen holder, I picked up 9 of these whilst at the big craft show at Ally Pally from the MDF man, the are beautifully made pen pots and only cost £1 each, their surface is lovely and smooth.
 The images are from the Avengers set of digi images and have been coloured with Copics, I think my fave is Black Widow, I love the way she pops from the lime green. The images have been fussy cut and clear embossed twice and then glued on. When I started out I was not going to use them on the pen pot, I was going to do a journal page but could not get them to work with a layout so needed to re think, If I did it again I would print them off so they all fit like the Black Widow but the little pokey uppy bits dont look to bad and at least with the embossing they will be quite durable.
 The pen pot its self was coloured with Acrylic Inks. I did not treat the surface at all, I just dropped a few drops of ink into a dish, added a drop or two of water and applied the inks with a sponge aplicator moving quickly as the inks dry very very fast. I lined the edges with my Black Copic marker and went for a pop art style. I think this is as clean and simple as I could do ;)
 We would love to see what you can come up with for our challenge, you have two weeks from today to get something made. You do not need to use an Octopode image but it is always great if you do and your name gets entered twice for the image prize.


Here are Thor and Hawkeye.
The other two are Captain America and Black Widow.

I would like to enter this into the challenge over at Simon Says Stamp And Show their theme is the letter 'S'  my S is Super Hero.


Monday, 3 June 2013

De Stempelwinkel - Another Pen Holder

It's time again over at De Stempelwinkel for me to share a little something with you. Head on over to see more pics and a little of what I did.
Thanks for stopping by xx

Sunday, 2 June 2013

Anything But A Card,- Anything Goes.

It's time for week two of the challenge over at Anything But A Card, Our theme is Anything Goes,
Sadly this is my last make for Anything But A Card, it is time for me to move on to new things and wish everyone involved with ABAC all the best and to say a great big thank you for having me as part of such a talented team.
 For my last make I am sharing a little book I made in a class held at my local craft shop, The Craft Barn. The class was held by Kathy Byrne and is part  of a monthly book making class.
 All the paper is form the 6x6 paper pad from Prima called 'Engraver' I do not use a lot of printed papers but this is a great set.It has a lovely vintage feel and is manly enough but should appeal to the ladies too.
 The book was made from chip board cut to shape and then covered with some thick black card, this was then over laid with the various papers. The pages have been created from plain envelopes, distressed round the edges and the papers were glued in place, there are a couple of pockets made from card added to the inside cover with an area left for some stamping or journalling.There is also a pocket on the back and I have added one to one of the inside pages, Perfect for adding some little tags or messages.
 I has been finished with a ribbon tie to hold the book closed.
.              


Thank you everyone for stopping by and sharing my post for ABAC it is certainly sad to be leaving but stay tuned for what's next ;)
Remember there is still one week left to take part, we would love to see you joining us. xx